Monday, November 18, 2013

Bramling Bitter

In my attempts to brew a good English Ordinary BItter, I wanted to try a few new hops and grains to make this a truly English beer. To make a great English beer, you will need to start with English malts; the most widely used of course is Maris Otter. Although I did not use Maris Otter as my base, the Riverbend Heritage malt is very similar in lovibond and possibly flavor profile. I want to follow up on that at a later date with a mini mash of each to test the difference. 

A twist on this beer are the selection of hops, Sovereign and Bramling Cross. Sovereign hops are very earthy/green tea characteristic and is a good middle of the road hop to accentuate a more powerful hop. The center stage hop in this beer is Bramling Cross which is a breed derived from Bramling and Manitoban hops (hence the "Cross"). Some English hop sites consider this an American style hop since it is very aromatic and flavorful but unlike American hops, it has a very constrained citrus profile but exudes black currants. In a low gravity beer like an Ordinary Bitter, it really shines!

Ingredients:

Malt -
7lb - Riverbend Heritage 6-row Malt
1lb - Crystal Maris Otter (55L)
8oz - Victory Malt
3oz - Acid Malt

Hops -
0.5oz Bramling Cross (7.8% AA) @ 60 min
0.5oz Sovereign (5.3% AA) @ 60 min
0.5oz Sovereign (5.3% AA) @ 20 min
0.5oz Sovereign (5.3% AA) @ 10 min
0.5oz Bramling Cross (7.8% AA) @ 0 min
0.5oz Sovereign (5.3% AA) @ 0 min

Water Prep:

My water has a very low mineral profile so I wanted to shoot for more of an English water profile. The addition of the 3oz of Acid Malt reduced my mash pH to 5.3 and the additions of Gypsum will help with the hop bitterness

Strike Water -
4g - Gypsum

Sparge Water -
8g - Gypsum 

Mash @ 152F for 60 min and boil for 90 min. I have started to do all of my boils for 90 min just to reduce the risk of DMS.

Measured OG - 1.040

Pitched a 1500 ml starter of Wyeast West Yorkshire Ale yeast. 

Measured FG of 1.007
ABV 4.3%

This beer was fantastic! It was served during our Halloween party and was quickly drained and I might have helped with that. Will make this one again very soon. I will up the Bramling Cross hops and try the Maris Otter base malt to compare to the Riverbend Heritage malt. 

Thursday, November 7, 2013

Homebrew Article in b-metro Magazine!

Myself and other members of our homebrew club, the CarboyJunkies, were fortunate to have local magazine, b-metro, run an article on homebrewing! Two of us were brewing that day and a few other Junkies came by to say hello and join in the fun. The day consisted of brewing, pictures and Q&A from Brett Levine from b-metro. I was very relived that the article was technically correct and that they ran the final article by us for any technical updates; it really irritates me when reading homebrew articles that were obviously written with no review by someone with brewing knowledge.

You can read the article below.

http://b-metro.com/something-is-brewing-in-birmingham/13200/

Wednesday, October 16, 2013

Cold Press Coffee Porter

My wife asked me the other day when I was going to brew another beer for her. She was never a beer drinker until a few years ago when she started to taste stouts and porters and really enjoyed them. Since the weather is turning cooler, it sounds like a good opportunity to brew a porter with the added kick of cold press coffee.

I have had a few really terrible homebrew versions of a coffee porter and coffee stout. All of them had the same thing in common, the brewer would make a pot of coffee and dump it in at some point during the process. This would cause the beer to be very astringent and acidic due to the acid pulled from the coffee beans during the coffee brewing. One method to circumvent this is to make cold press coffee which is the process of combining cold water and coffee grounds and letting it steep 24 hours in the refrigerator. Here is the exact process I used:

Sanitize a quart mason jar. Add 12oz of filtered cold water and 2T of freshly coarse-ground coffee beans. Shake to combine and place in the refrigerator for 24 hours. Strain through a coffee filter to seperate the grounds from the liquid. I added this at flame out or you can add it to secondary. 

I followed the guidelines for a Robust Porter style:

Ingredients:

Malt -
7lb - Riverbend Heritage 6-row Malt
2lb - Munich Malt
1lb - Crystal 120 Malt
0.5lb - Victory Malt
0.25lb - Carafa III
3oz - Acid Malt
1lb - Corn Sugar

Hops -
1.5oz UK Fuggles (3.6% AA) @ 90 min
1oz UK Fuggles (3.6% AA) @ 60 min

Water Prep:

My water has a very low mineral profile so I wanted to shoot for more of an English water profile. The addition of the 3oz of Acid Malt should also lower my mash pH to 5.3 which is my target for brewing a darker beer.

Strike Water -
1g - Calcium Chloride
1g - Gypsum

Sparge Water -
1.5g - Calcium Chloride
1.5g - Gypsum 

Mash @ 154F for 60 min and boil for 90 min. I have started to do all of my boils for 90 min just to reduce the risk of having DMS. 

Ferment with Wyeast 1056 @ 66F

Measured OG - 1.055

I did seem to miss my mark on the pH of the mash. I got busy with something else and did not check the mash at 30 min so I checked it at 50 min and the measured pH was 5.26 which was very low from my target of 5.3 pH with the EZ Water calculator. I am thinking the Riverbend Heritage malt is the cause of the miscalculation as it has a higher SRM than a traditional base 6-row malt. 

11/18/2013 - Update:

Measured FG - 1.009
ABV 6.1%

The finished beer turned out ok but not great. It has a slight bitter after-taste, the same type of bitterness you would encounter in a fruit pit such as a peach. The coffee flavor is present but not overpowering, the bitterness is just too much to really get a grasp on the intricate flavors of the coffee. The next time I will back off on the Crystal 120 and add some lighter crystal to balance out the flavor and not add the Gypsum. I will also use a more robust coffee and up the amount to bring out more of the coffee notes. 

Friday, September 20, 2013

Ward Labs Water Report

There has been a lot of buzz recently in regards to water profiles in brewing. My guess is since the new water book is being released by John Palmer and Colin Kaminski, a lot more people have taken notice to this very important ingredient in beer. One valuable resource to a homebrewer is their local water report that is provided by their water supplier. Although they provide readings in ranges, this will get you fairly close to your water profile. one major issue with water supplier reports is that your water source may change due to weather patterns or time of season; its never going to be very accurate. 

Luckily the good people at Ward Labs provides us with a cheap way to test our H2O by sending off for a water report. To submit a water sample, download the order form from here:


I sent my sample in a thoroughly rinsed plastic vodka bottle that fit perfectly in a USPS flat rate box. Ward Labs will perform the analysis and email you the results along with the invoice for payment. They accept credit cards over the phone or you can pay by mail. 

Below is my water report:


My water is on the soft side with not a lot of sulfate. Ward Labs does measure sulfate as sulfur so you will need to convert this to the actual mass of sulfate per liter (just multiply the SO4-S by 3; it will get you close enough). Another thing to note is my pH level which is a bit high. 

A great resource to tweak your water profile, based on your grain bill, is EZ Water Calculator:


Download the spreadsheet and you will be able to plug in your water profile (don't forget, multiply Sulfate by 3), and your grain bill and it should give you a fairly accurate report. I would still advise to check your mash pH with a properly calibrated pH meter just to be on the safe side.   

Tuesday, August 20, 2013

Sparge Arm & HERMS

One of the goals of my new setup was to be able to heat my mash either by direct or indirect method in order to perform different mash steps. Since my setup is three keggles, it would be very easy to do a HERMS and would not require much more effort since I already have an immersion chiller which I made from 50' of 1/2" copper tubing and 1/2" MPT connections. I used MPT or FPT connections on every piece of equipment just in case I ever needed to swap a component out; makes life easier rather than trying to un-solder a component.

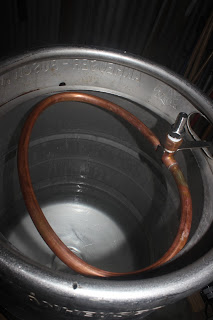
I had a piece of 1/2" copper tubing left over from making a whirlpool attachment so after a quick run to HomeDepot to purchase a T adapter and 1/2" FPT adapter. After a bit of bending, soldering and drilling:


I initially was going to let the sparge arm rest on the kegggle top but quickly found out that was going to be a pain in the arse and it wouldn't stay in place unless I used a clamp to hold it on securely. After looking around the shop a bit, I found a solution!


An old curtain rod hanger works perfect!


I only needed to drill one hole in the keg to support it. Placing the sparge arm in the hanger at the base of the T creates a snug fit.


The sparge arm is a little wider than the opening of the keg which helps hold the arm in place as well.

For the HERMS, now all I have to do it place my immersion chiller in my HLT and run a jumper hose from the immersion chiller outlet to the sparge arm. To make life a bit easier, I also replace the inlet on the immersion chiller with a camlock in order to make a connection to my chugger pump.


Tuesday, August 13, 2013

ESB, First Attempt

This was brewed on 8/11/2013

Since my kegs are currently empty, it is probably wise to brew an ale while all the other sours and lagers are fermenting away. Dry kegs make me sad... I am still trying to dial in my system and for the first time, felt like I actually got things right! The brew day was pretty uneventful except for not getting a cam-lock on properly while doing the boil recirculation for the whirlpool. Boiling wort all over your hands and feet will make you curse all of the gods...

Ingredients:

Grains:
11 lb - Riverbend Heritage Malt
8 oz - Aromatic Malt
8 oz - Crystal 40L
8 oz - Melanoiden Malt
4 oz - Crystal 120L
4 oz - Special Roast

Hops:
2 oz - EKG @ 60 min
.5 oz - EKG @ 20 min
.5 oz - EKG @ 1 min

Yeast:
White Labs WLP002 - English Ale

Misc:
1 gram Calcium Chloride
2 grams Chalk
5 grams Gypsum

Mash at 154F for 60 minutes
Boil for 60 minutes

OG (measured): 1.054

Started fermentation at 62F. Thanks to the guys from the CarboyJunkies on the fermentation temperature recommendation. Fuller's will start their fermentation at 63F before raising to 68F and then will lowered back down.

http://byo.com/stories/issue/item/2318-fuller%E2%80%99s-the-pride-of-london

8/16/2013 Update:

Took a small sample of the beer and it is reading 1.018. I cranked the temp up to 69F and roused the yeast. I am looking for a FG of 1.016.

8/23/2013 Update:

Kegged the ESB this afternoon. I did a refractometer reading and it measured 7.7 brix. Doing a brix FG calculation, it started at 13.5 brix which means the FG equals 1.015. Just to be sure, I took a hydrometer reading and sure enough, 1.015! Im always OCD about reading and not trusting them but I now, finally, have 100% confidence in my refractometer.

Monday, August 12, 2013

Oktoberfest!

It's that time of year! Time to say goodbye to summer and hello to football season! There is not much better than watching football with a slight crisp breeze in the air while eating freshly made soft pretzels and washing them down with a nice Oktoberfest. I am a big fan of the German Oktoberfest but that's not to say I do not also enjoy some of the American versions as well. The joy of seeing Sam Adams Oktoberfest hit the shelves means summer is coming to an end. This year I got a late start on my Oktoberfest as we were traveling around Europe for our honeymoon. I would have preferred to brew this in June instead of the first of August. Oh well.

Ingredients:

Grains:
8 lb - Vienna Malt
3 lb - Munich Malt

Hops:
2 oz - Hallertauer @ 60 min

Yeast:
Wyeast #2633 Octoberfest Lager Blend

Misc:
1 gram Chalk added into the mash.

Mash at 154F for 60 minutes
Boil for 90 minutes

OG (measured): 1.056

I started fermentation at 49F and after a week, slowly stepped the temp up to 64F. It will need a little more time for the diacetyl rest to clean up and then it will be time to transfer to lager.


Wednesday, August 7, 2013

Riverbend Malt

One of the great things about being in a homebrew club is learning about new things from other members of the club and being introduced to these great finds. A couple in the club were gracious enough to put together a group grain buy from Riverbend Malt House in Ashville, NC. Riverbend provides artisan malts to local breweries in the Ashville area and also contracts with local farmers who grow their barley, wheat and rye.


Riverbend uses 6-row Thoroughbred barley for their base malts which provides a higher protein content than 2-row varieties.  6-row is also not as "plump" as the comparable 2-row varieties but this also varies due to farmer conditions (rainfall amounts, soil nutrients, etc..).


I grabbed a bag of Pilsner and a bag of Heritage malt. Riverbend on their Heritage variety:

This 6-row malt is produced from Thoroughbred barley grown in near Salisbury, NC. It makes the perfect base malt for a variety of darker styles, such as a Vienna Lager, German Alt or California Common. It has a more pronounced flavor and aroma profile than our Pale Malt, which contributes a slight nutty flavor, but allows the specialty grains to take center stage.

Lovibond: 6-7
DP: 65

Suggested Usage: 5-95%

I'm looking forward to brewing with the Heritage malt and will try to come up with a beer recipe that really showcases this base malt. 

Monday, August 5, 2013

Sour Mash Berliner Weisse #2


This is my second attempt at a sour mash Berliner Weisse beer with a few adjustments to the original version. I wanted to bring the wheat percentage up in this recipe to increase the beady characteristics which are prevalent in this style. Along with the increase in wheat, I also changed to Wyeast 1272 because I was lazy and didn't want to drive 20 minutes to purchase a vial of WLP001. Acidulated malt amount remained the same but more on that later.

Ingredients:

3.5 lb - Pilsner
2.5 lb - Wheat
8 oz - Acidulated Malt
1 oz - Williamette Hops @ 15min
Wyeast 1098

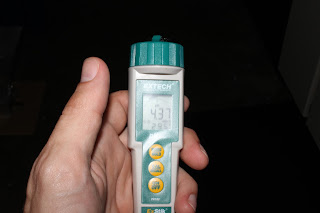
My mash was a bit different this go around as well. I dropped the mash temp down to 149F and let it rest for ~80 minutes to ensure I achieved full conversion. Berliner Weisse beer styles typically run in the pH range of 3.2 - 3.4 of the finished beer due to the lactic acid production and low mash pH. To reach this pH level, the addition of the Acidulated Malt helps to reduce the pH of the mash and gives the lactic acid an environment suitable to grow in. According to Weyermann, Acidulated Malt should reduce the pH of the mash by 0.1 per 1% addition of Acidulated Malt to the grain bill. To test this I mashed in and let the mash rest for 5 minutes before taking a pH reading. My normal mash pH is 5.2 - 5.4 depending on the grain but since this is all base malt, I would say the mash should have been at 5.2 level without the Acidulated Malt addition. Since I added 8oz of Acidulated Malt, this should have reduced my mash pH by 0.8.. Quick math here: 5.2 - 0.8 = 4.4 pH. My pH meter reads 4.37 pH.. that's close enough! 


After the mash was complete, I dropped the temperature down to 105F by adding ice and then covered with plastic wrap to cut down on the oxygen being in contact with the mash. Added heating pad and temperature probe and we will see how it comes along in a few days. 


8/7/2013 Update:

Took a pH reading this afternoon and it clocked in at 3.42 pH. Since the style's pH range is 3.2 - 3.4, I decided to go ahead and drain the mash instead of waiting another 24 hours to finish the brew and running the risk of it being too sour. 

BeerSmith calculated my sparge water volume to be 2.5 gallons but my final collected wort gravity was 1.042! The pre-boil estimate was 1.026! Holy smokes! I added another gallon of water to bring it down to 1.033. 

Boiled the wort for 20 minutes with a 15 minute hop addition of 1oz Willamette hops. 

8/12/2013 Update:

Sampled some of the beer tonight and it shows promise of being a fantastic beer. It is not over powering sour like the first attempt. The nose gives you the idea of it being sour but the fumes do not hit you in the back of the throat. The taste is sour but very earthy at the same time (grass and minerals). Again, not overly sour this time and is more balanced than before. It seems to need another 5 or so days in the primary to clean up.

Wednesday, July 31, 2013

Cantillon Brewery Visit!

For our honeymoon, my wife and I decided to take a trip to Europe and catch the final stage of the Tour de France in Paris. Flying into the Paris airport is more expensive than the surrounding areas so after some research, we chose Brussels as our city to fly into. This meant we were going to Belgium! Oh joy!


Cantillon is one of my favorite breweries and probably in my top three. Getting a chance to visit was truly inspiring and stunning. It is hard to believe that they produce as much beer as they do from this small space.

Wall o' stickers as you walk in. Nice to see some of the good guys up there like Firestone Walker and Victory.


Right past the entrance on the left is the taproom where you receive two free samples of beer after the tour. More on those later... 


As you begin the tour, you walk down a corridor that leads to the actual brewhouse itself. This is where they bottle condition the beer in the brewery. Cantillon also rents space in an old WW2 bunker in Brussels to age their beer. I believe they started this back in 2011 and have enough space for ~80,000 bottles. Right now they have no plans to sell any beer that is aged in this bunker. Bummer...


Up close shot of the bottle stacking


More bottles and crates. 


On the first floor in the back of the brewery is where the actual brewing equipment is located. The mash tun is located on this floor. The grain mill itself is located on the floor above the mash tun. In the back ground you can see the bottom of the boil kettle that is on the second floor. 


Inside shot of the mash tun. They mash the grains in steps which will take 2 hours to complete. Grain bill consists of 65% barley and 35% wheat.  


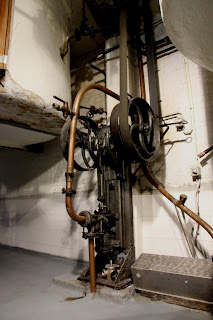
Everything in the brewery seems to be pulley based. This is a shot of what seems to be one of the pumps on the ground floor.


You take a very narrow staircase up to the second floor where the grain mill and boil kettles are located.


Up close shot of the plate on the vent hood.


Inside look of the boil kettle. Looks like they purchased the whirlpool attachment for the boil kettle from morebeer.com. The copper rings inside the kettle is where steam is pumped through to boil the wort. Cantillon boils the wort for 3-4 hours and will lose ~2,500 litres of liquid during the boil. 


Grain mill. Again, everything seems to be belt driven. 


After the boil is complete, the hot wort is pumped into the attic onto the cooling ship where the wort cools and is infected with wild yeast from the cool air that flows through the vents in the rafters. The cooling ship was made by a coppersmith who only used rivets to construct it; there is not a single weld in the entire vessel. 


Here is a better look at the vent holes. It was hotter than hell up here during our visit; that day it was 92F in Brussels but during the brewing season (Fall and Spring) the temperature is much cooler and conducive to brewing.


After the wort is cooled, it is then gravity fed into the square, open fermentation chamber. Either fermentation takes place here or the wort is pumped into oak or chestnut casks for fermentation.


Brewers desk where they keep notes on the brew process. This is behind the fermentation chamber. 


A shot of the attic area and my wife. They use this for extra storage and hop aging. 


Bales of hops that are being aged. Note the date on the bales. 


We proceeded back down to the second floor where the barrel aging occurs. A sign as you enter the barrel aging chamber. Translated: Time does not comply with what is done without him. 


Wood! Literally! Sweet Jesus....


I want to know how to get one of these! 


I thought this was very cool. This is their old bottling machine that I assume is still used from time to time. 


Back down on the ground floor. A shot of the bottling and label machine.


And now that the tour is over, on to the drinking! First up, we had the straight Lambic. 


Next, the Rose de Gambrinus. The beautiful red color is imparted by the raspberries used during fermentation. Absolutely wonderful beer. 


Sadly we had to leave and I really hope we get to visit again one day while they are brewing to see some of the process. They only brew the wild beers from mid-October to early April.


Friday, July 5, 2013

Belgian Triple w Brett B

7/5/2013

I can't think of a better way to celebrate America's birthday than brewing a beer. A Belgian beer that is... The base beer I wanted to start with is a Belgian Triple but with some additional flavor characteristics to add depth. Belgian Candi sugar and honey seem like a good combination to play off of the Brett B. flavors and the spices produced by the WLP500 Trappist Ale Yeast.

A few days before the brew, I made a pound of Amber Belgian Candi Sugar. If you don't have a Silpat, I highly recommend one. The would-be sticky mess of the Candi Sugar is no match for the Silpat.


Ingredients:

11 lb - Pilsner
4 oz  - Aromatic Malt
4 oz  - Wheat Malt
1 lb   - Amber Belgian Candi Sugar (@ 10 min)
2 lb   - Honey (@ 10 min)
1.85 oz - Tettanang Hops (@ 60 min)
1 oz - Saaz Hops (@10 min)

1500 ml Yeast Starter of WLP500 Trappist Ale Yeast
Wyeast 5112 Brettanomyces Bruxellensis

152F Mash Temp 
90 Minute Boil
66F - 70F Fermentation Temp

1.075 OG

I pitched the yeast starter and Brett at 65F and fermentation has already started as of this morning. My plan is to let the Brett perform its magic over the next few months and hopefully it will be ready late fall/early winter. 


Update 7/31/2013:

I transferred the beer to a secondary vessel to rack off the primary yeast and to add cherries for long term aging.

Notes:

Gravity - 1.016 (I expect this to go down a good bit after the Brett works its magic; the expected FG before conditioning is 1.017 so the gravity was nailed.)

Aroma - The honey is really coming through on the nose along with a pepper and coriander aroma in the background.

Taste - Honey! Lemon Zest, fresh cracked pepper, bread crust and wow... a very velvety mouth-feel. At this point, the Brett is not coming through but that is expected since it has only had a month to work.

As noted, I added 2 lb of sweet dark cherries to the secondary and racked on top of them. I purchased frozen cherries as they are cheaper and the ice crystals do a good job of macerating the cherries so they will impart more flavor into the beer. As luck would have it, two days later Publix put fresh cherries on sale for $2.99 lb.... Oh well..

I do plan on adding more cherries about a month before finishing to boost the cherry flavor and aroma.


Wednesday, June 26, 2013

Estaminet

One of my favorite beers right now. Pick a six pack up if you enjoy a good pils.

Sour Mash Berliner Weisse - Medal Winner!

A Berliner Weisse is one of my favorite styles of beer during the summer months in Alabama. A good description would be a lawnmower beer, the kind you want to drink after cutting the grass and sweating two pounds off. I wanted to brew a 100% sour mash version of this style so I could go from grain-to-beer in two weeks instead of pitching lacto and waiting for it to sour, which could take months.

(Note: This is for a 4 Gallon batch)

Ingredients:

3lb - Pilsner
1lb - Wheat
8oz - Acidulated Malt
0.5oz - Williamette Hops
WLP001

Mash temp of 152F with a 60 min rest time.

Sour Mash Berliner Weisse Beer XML

I used my igloo cooler mash tun since the temperature needed to stay ~105F during the sour mashing. The lactobacillus that occurs naturally on the grain has an optimal growth temperature between 98F - 108F. After  mashing I dropped the temp down to 105F with ice and placed a seedling heating mat under the cooler on a temperature controller. I also purged the free head space in the cooler with CO2 to flush the oxygen out in order to keep the bad bacteria growth down. The next morning the temperature had already dropped to 95F so I placed my fermwarp on top of the cooler and wrapped the cooler in a heavy quilt. After a few hours the temperature climbed back up to 105F and remained consistent.

Now for the fun part, 24 hours later I opened the cooler with boyish excitement. The smell wasn't as bad as I expected, it was fairly vegetal but overall, not putrid. 48 hours later there was still a hint of vegetal aroma but this time, the sourness started to come through. A quick taste of the wort gave me hope it was not going to be an infected mess. There was a sour note but it was not overly sour at this point; maybe a 4 on a scale of 1 to 10.

The next day I sampled the wort again (at this point it had been 72 hours). It was sour... Jaw biting sour.. On a scale of 1 to 10, it was an 8. I ran off the wort and did a 30 minute boil to stop the lacto growth and to kill anything else off that might be reproducing. After a chill down to 70F, I pitched a vial of WLP001. Fermentation was very quick and over in 2 days. I left it on the yeast for a little over a week and my FG reached 1.009.

The beer itself is very beautiful, just what you would expect from a BW. Straw like color that is cloudy and very effervescent. The flavor is sharply sour but finishes a little fruity and sweet. Maybe I will pitch a healthy starter next time to see if that has any impact on flavors and FG.

As I write this, there is not a drop of it left... The keg went quick with the help of friends and I sent the beer off to Walk on the Wild Side in Florida and the Bluegrass Cup in Kentucky. I did receive score sheets back from Walk on the Wild Side already but none from Bluegrass Cup as of yet.

Walk on the Wild Side Score Sheets

Update:

This took third place in the Alabama Brew Off in the Sour Beers category.


Hello World!

I am keeping the first blog post short and to the point. No rambling about how this is my "exciting new foray into blogging and beer!" or any other self-indulging crap that no one else cares about. I just want to have a place to collect my beer related brewing notes, tastings and such. 

I have been brewing for 3 years and can now finally admit to such since Alabama was gracious enough to pass legislation this year that legalizes homebrewing. Next year we might be fortunate enough to get electricity and socks... For as long as I have been brewing, I have been a part of the CarboyJunkies hombrew group here in Birmingham. We are not a serious bunch but we do have some people who make damn good beer.